Monday, January 24, 2011

SmartFoxServer Tutorial: Chat Log

Hello everyone!

It's been a while since I posted on this site. I'm sorry about that, I've just been a little busy on a new project I'm working on. Anyway, as you can tell from the post title, this tutorial is on how to create a chat log. The chat log we create in this tutorial will have an auto-scrolling feature. Anyway, let's get started!

First things first, I'm using an avatarChat example file from SmartFoxserver. So, let's go ahead and open that file up.

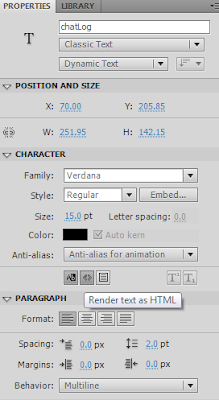
After the file is opened, go to the 'chat' frame and put a dynamic text box on the stage and give it an instance name of chatLog and make sure you tick the box shown below so that it has HTML abilities.


After you do that, you need to open up the 'chat' frame's coding. After the coding is up, scroll down until you find a SmartFoxServer handler called "smartfox.onPublicMessage." Add this coding inside that handler:

//New Chat Log Coding:
//--Basic Add Message Coding:
chatLog.htmlText += user.getName() + ": " + msg + newline; //Add text to textbox
//--Basic Auto-Scroll Coding:
var logVar = 1; //Creates a variable, you might want to increase this
chatLog.scroll = logVar; //Scrolls textbox to variable amount
logVar++; //Increases variable value

Pretty basic coding, as you can see. Here is an image of where I added that coding in my Flash file:


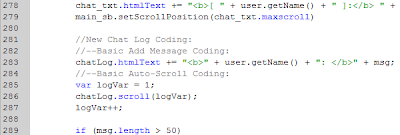
(Coding in the image isn't correct, use the coding as shown above!)

Well, after you do that, test the movie and it should be working fine.

If you encounter any problems with this be sure to leave a comment and I'll get back to you as soon as I can.

Source File: Download

Monday, January 10, 2011

SmartFoxServer Tutorial: Playercards

Hey everyone!

In today's tutorial, I'm going to show you how to make a playercard, which when an avatar is clicked, a playercard will appear and show the user's username. Anyway, let's get started, shall we?

To begin with, I'm going to let you know that I'm using the avatarChat example file for this tutorial. Anyway, the first thing your going to want to do is open up the actions panel for the chat frame and add this coding to it:

function showPlayerCard() {
loadMovieNum("playercardSWF.swf", 1);
}

Basically all that coding does is tell the Flash file to load an external file, which I'll be using to display the playercard.

The next thing you'll want to do is open up the avatar movieclip from the Flash library. In this movieclip, you will be able to clearly see all the instances in your avatar.


Anyway, on with the tutorial. Click on the disc movieclip (don't double click) and add this coding:

on (release) {
_global.lastP2 = _parent;
_global.lastP2Name = _parent.name.text;
_root.showPlayerCard();
}

That coding basically tells the Flash file what the username of the player is and to load the playercard.

The next, and last, thing to do is to make the playercard. I quickly made a playercard SWF file, saved it, and published it with the name playercardSWF. I also saved it in the same location as the avatarChat example file that I'm using for this tutorial.

Now, the architecture I used when making my playercard SWF file was making a text file to display the user's username and adding a background to it as well. I also added a few extra things to my file for interactivity, which aren't required.

Anyway, after adding a dynamic text field with an instance name of playerName, I put the background of the playercard and the dynamic text field both in a movieclip named thePlayerCard.

The last thing I did, was add some coding on the first, and only frame of the playercardSWF file. The coding I added to the playercardSWF file on the root frame was this:

function loadPlayer(mc, uname) {
thePlayerCard.playerName.text = uname;
}
loadPlayer(_global.lastP2,_global.lastP2Name);

After you do all the above, test your movie and you should clearly see that it works just fine.

If you have any questions, comments, or if you run into any errors when following this tutorial, be sure to leave a comment and I'll reply to it as soon as I can.

Download playercardsTut Source File: Download
Download playercardSWF Source File: Download

Saturday, January 8, 2011

SmartFoxServer Tutorial: How to Add Rooms

Hello everyone.

In this tutorial, I'm going to show you how to add rooms into the SmartFoxServer config.xml file. This tutorial is in a video that I posted on YouTube. Here is the video:


If you have any questions or comments, feel free to leave them in a comment and I'll reply to them as soon as I get a chance.

SmartFoxServer Tutorial: Multi-Colored Chat Bubbles

Hello again everyone.

In this tutorial, I'm going to teach you how to make multi-colored chat bubbles. One example of what I mean by this is below.

Let's say the creator of a virtual world wants to be known in his virtual world for being the creator of the game. Everytime he says something publicly, we can indicate his chat bubble to be blue, instead of white, like the SmartFoxServer example file's default color.

So, with that being said, let's get started.

The first thing I'm going to do is open the Flash library and edit the avatar movieclip inside the _GUI and _Avatars folders. I'm now going to double click on the bubble movieclip to edit the avatar's chat bubble.

At this point, I'm going to add a new keyframe on each layer. In the new keyframe, I made the chat bubble blue and put some static text on top of the bubble which says "Creator."


I'm also going to name the one of the second frames "creator" as an easier way to go to that frame.

Now after that's done, it's time to code it into the avatarChat file. The coding for this will go inside the chat frame inside the onPublicMessage handler. This is what I added in my Flash file:

if (user.getName() == "nameHere") {
mc.bubble.gotoAndStop("creator");
}
Here is a picture of where I added the coding to in my file:


Also, you are going to have to edit the part of coding that says 'nameHere' to a username you want. After you do that, the user's chat bubble should be at the creator frame whenever the user says something publicly.

So, that's really all for this tutorial.

As usual, if you have any questions or comments, don't hesitate to make a comment on this post!

Source File: None

SmartFoxServer Tutorial: Arrow Key Rotation

Hello everyone.

In this tutorial, we are going to make a simple avatar rotation, as some would call it. This tutorial can be very easily compared to my first tutorial on this site, which was a setUserVariables tutorial. In this tutorial, we are going to learn how to change avatar directions by using the arrow keys. So, let's get started with this very simple tutorial.

Before i started typing up this post, I created an example file, which the download link can be found at the bottom of this post, and it is very easily done. So, the first thing you are going to want to do is open up your Flash library (Window -> Library or Ctrl+L).

After you open up the library, find the _GUI folder and open the folder to reveal the contents. Now open the _Avatars folder to reveal it's contents as well. Right click on the disc movieclip and press the Edit option.

Now that you are able to edit the movieclip, I added two more layers to my file. One named Labels and the other one named Arrows. I made each frame a blank keyframe by selecting the new frames and right clicking, then clicking "Convert to blank keyframes."

After you do that, you need to name four frames in that movieclip to four directions, which are left, up, right, and down. Do this by clicking on a frame and opening the Flash properties menu (Windows -> Properties or Ctrl+F3).


I then made directional arrows on the correct frame. Example: Left arrow on the "left" frame.

Now that the hardest part is done, it's time for the simplest part in this whole tutorial: the coding. All the coding in this tutorial goes on the chat frame of the avatarChat example file.

Here is the coding I used:

_root.onEnterFrame = function() {
if (Key.isDown(Key.LEFT)) {
_root.smartfox.setUserVariables({col:"left", init:true});
_root.myAvatar.disc.gotoAndStop("left");
}
if (Key.isDown(Key.UP)) {
_root.smartfox.setUserVariables({col:"up", init:true});
_root.myAvatar.disc.gotoAndStop("up");
}
if (Key.isDown(Key.RIGHT)) {
_root.smartfox.setUserVariables({col:"right", init:true});
_root.myAvatar.disc.gotoAndStop("right");
}
if (Key.isDown(Key.DOWN)) {
_root.smartfox.setUserVariables({col:"down", init:true});
_root.myAvatar.disc.gotoAndStop("down");
}
}
I put the coding at the very bottom of the chat frame. Well, basically all the coding does is constantly check to see if an arrow key is down or not. If an arrow key is down, it updates the user variables (which is handled by the event onUserVariablesUpdate) and then makes the action to the server, then the client as well.

Well, that's all for this tutorial!

If you have any questions or comments, feel free to ask by making a comment! :)

Source File: Download

Friday, January 7, 2011

SmartFoxServer Tutorial: Private Messaging

Hello again.

In this tutorial, as you can probably tell from the title of this post, is about private messaging. Anyway, let's get started with this tutorial. By the way, for this tutorial I'm using the SmartFoxServer avatarChat example file.

First of all, you have to make a button which will open the send message window.


Now, I just labeled mine with the text "Open." You can label yours with something else, such as send if you want. You can also give the button an instance name if you want. This isn't required, but I do that with all my symbols.

The next thing we will do, is make the private message window. In the window, this is where you will see the messages received and it will also be used to send messages. Here is the window I made:


I have multiple items in my private message window, so now I'm going to explain each one to you. Also, my window's instance name is pmWindow.

1 - Dynamic text box, which I gave an instance name of whoToSend.
2 - Input text box, which I gave an instance name of msgToSend.
3 - Button symbol, which will be used to send the private message to the desired user.
4 - Dynamic text box, which I gave an instance name of msgText.
5 - This is optional, but I made the top part of my window draggable.
6 - Button symbol, which will be used to close the window.

Now all that we need to do is code the updates to the avatarChat file. For the main coding, I'm going to just use functions for simplicity.

I'm just going to paste on the coding that I added to the chat frame of the Flash file at this point.

_root.pmWindow._visible = false;

function openPm() {
var uPm = _root.userList_lb.getSelectedItem().data;
var targetUser = _root.userList_lb.getSelectedItem().label;
if (uPm != _root.smartfox.myUserId()) {
_global.tUser = targetUser;
_global.uPm = uPm;
_root.pmWindow._visible = true;
_root.pmWindow.whoToSend.text = "Do you want to send a private message to " + _global.tUser + "?";
} else {
trace("You can't send a private message to yourself.");
}
}

function sendPm() {
var pMsg = _root.pmWindow.msgToSend.text;
if (pMsg != "") {
_root.smartfox.sendPrivateMessage(pMsg, _global.uPm);
_root.pmWindow.msgToSend.text = "";
}
}

function closePm() {
_root.pmWindow._visible = false;
}

smartfox.onPrivateMessage = function(msg:String, sender:User) {
_root.pmWindow._visible = true;
_root.pmWindow.msgText.text += newline + sender.getName() + ": " + msg;
trace(msg);
trace(user.getName());
}
I wrote that coding all that coding at the very end of the chat frame coding. That's all the frame coding, so we're almost done. All we have left to do is add the button coding. On the send private message button, add the following coding.

on (release) {
_root.sendPm();
}
Now, on the close window button, add this coding:

on (release) {
_root.closePm();
}
Also, on the open window button, be sure to add this coding:

on (release) {
_root.openPm();
}
Now, to use the private message feature, you have to click a username on the userlist and click the open button. You can't click on yourself because this was just a quick little tutorial I rushed through.

Anyway, that's all for this tutorial.

If you have any questions or comments, then be sure to comment on this post and I'll reply as soon as I get a chance!

Source File: Download